

This lesson is made with PSPX9
But is good with other versions.
© by SvC-Design

Materialen Download :
Here
******************************************************************
Materials:
14_k35.jpg
PALETTE COULEURS VERSION 1.png
DECO PERSO 1 205 JANVIER 2024 SWEETY.png
DECO PERSO 2 205 JANVIER 2024 SWEETY.png
DECO PERSO 3 205 JANVIER 2024 SWEETY.png
SIGNATURE TUTORIELS .pspimage
SELECTION 1 205 .PspSelection
SELECTION 2 205 .PspSelection
SELECTION 3 205 .PspSelection
SELECTION 4 205 .PspSelection
SELECTION 5 205 .PspSelection
75059981339bba97c6845a3745dcc423.jpg
FEVRIER 2024 DEGUISEMENT PASCAL 2 11 02 24 SWEETY.png
FEVRIER 2024 GNOME EASTER DAY 11 02 24 SWEETY.png
******************************************************************
Plugin:
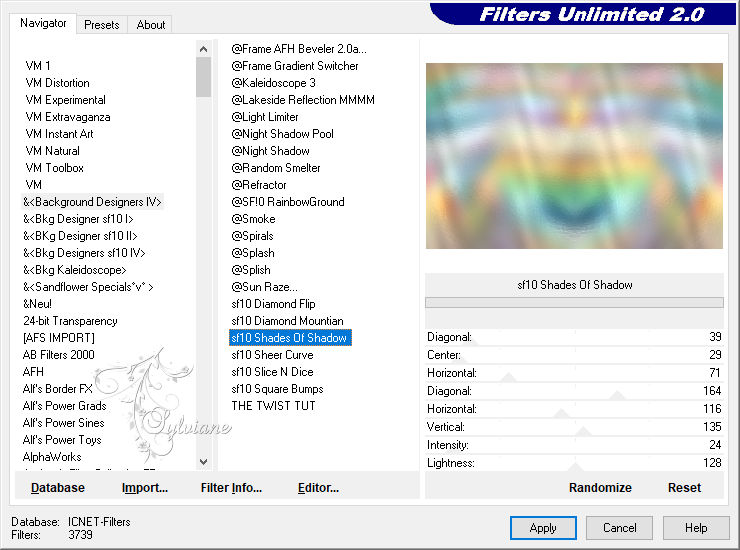
Effects – plugin - Filters Unlimited 2.0 - & <Background Désigner IV > - sf10 Shades Of Shadow
Effects – plugin - VM Toolbox - Zoom Blur
******************************************************************
color palette
:

******************************************************************
methode
When using other tubes and colors, the mixing mode and / or layer coverage may differ
******************************************************************
General Preparations:
First install your filters for your PSP!
Masks: Save to your mask folder in PSP, unless noted otherwise
Texture & Pattern: Save to your Texture Folder in PSP
Selections: Save to your folder Selections in PSP
Open your tubes in PSP
******************************************************************
We will start - Have fun!
Remember to save your work on a regular basis
******************************************************************
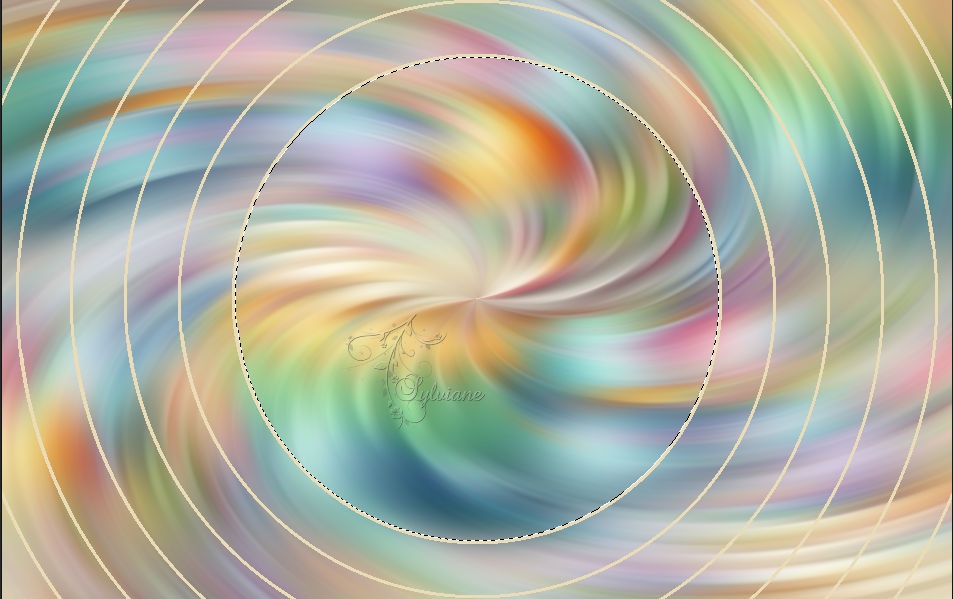
1.
Open a 950/600 transparent layer.
Selection - Select All
Open 75059981339bba97c6845a3745dcc423.jpg
Edit - Copy.
Edit - Paste into selection.
Selection - Select None
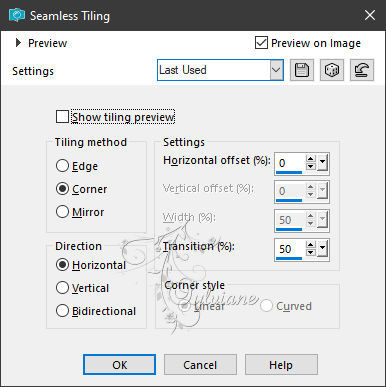
Effects - Image Effects - Seamless Tiling- default
Angle / Bilateral / Linear: Controlled / 0 / 0 / 50 -
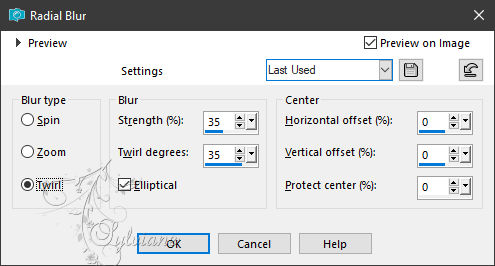
Adjust - blur - radial blur
=============================================================
2.
Layers - New Raster Layer
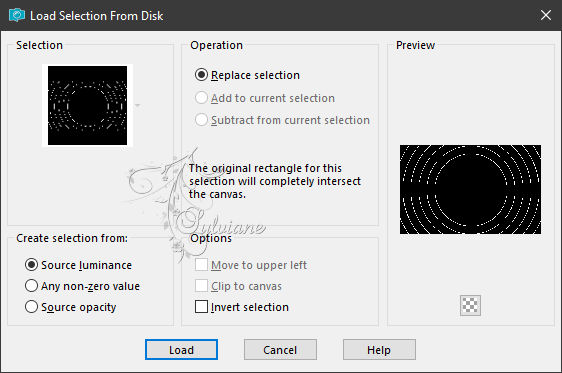
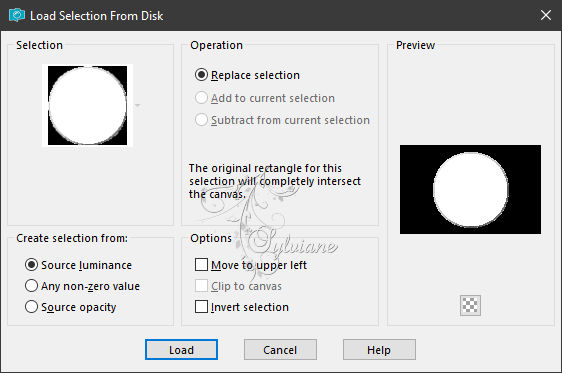
Selections - Load / Save - Load selection from disk - SELECTION 1 205 .PspSelection
Fill the selection with the AVP or ARP color of your choice
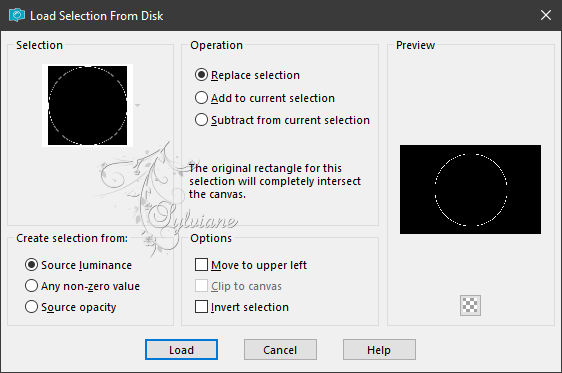
Selections - Load / Save - Load selection from disk - SELECTION 2 205 .PspSelection
(It will take the place of the previous selection)
Selections – Promote selections to layer
Selection - Select None
=============================================================
3.
Ativate magic wand Tool - tolerance 0====>click in the blank part of this circle
Activate raster 1
Selections – Promote selections to layer
Layers - arrange – up
(It must be between * Raster 2 * and * Promoted Selection *)
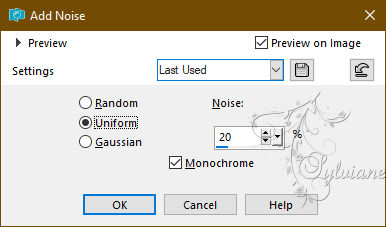
Adjust - Add / Remove Noise - Add Noise
Selection - modify - contract -10px
Fill the selection with the AVP or ARP color of your choice
Selection - modify - contract – 4px
Erase OR delete on keyboard
Here we are still active with the selection:

=============================================================
4.
The selection is still active...
Layers - New Raster Layer
Layers – arrange – move down
Open 75059981339bba97c6845a3745dcc423.jpg
Edit - Copy.
Edit - Paste into selection
Selections - Invert
Effects - 3 D effects - Drop shadow
0 /0 / 60 /30 - color :#000000
Selections - Invert
Open DECO PERSO 1 205 JANVIER 2024 SWEETY.png
Edit - Copy.
Edit - Paste into selection
Selection - Select None
=============================================================
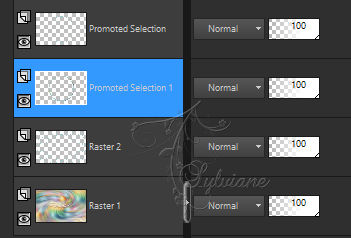
5.
Activate Promoted Selection
Layers – merge – merge down
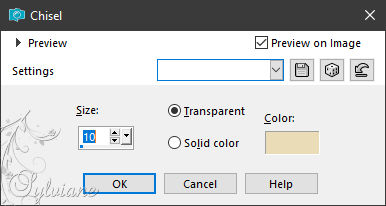
Effects – 3D effects – chisel
Layers - Duplicate
Layers – merge – merge down (2x)
=============================================================
6.
Here we are:

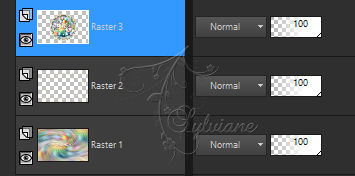
Activate Raster 2
Layers - Duplicate
Effects - Image Effects - Seamless Tiling
Layers – merge – merge down
Effects - 3 D effects - Drop shadow
1 /1 / 60 / 1 – color :#000000
=============================================================
7.
Activate Raster 3
Layers - Duplicate
Effects - Image Effects - Seamless Tiling
Layers – arrange – move down (2x)
(It must be between * Raster 2 * and * Raster 1 *)
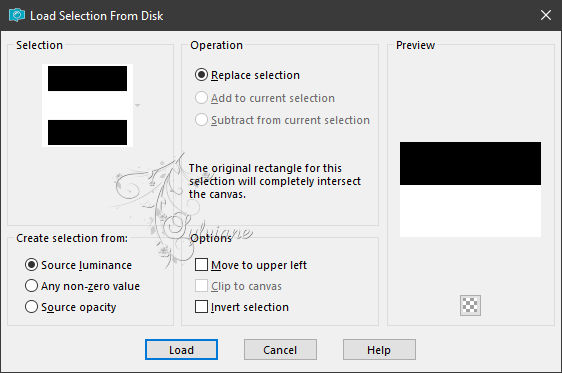
Selections - Load / Save - Load selection from disk - SELECTION 3 205 .PspSelection
Erase OR delete on keyboard
Selection - Select None
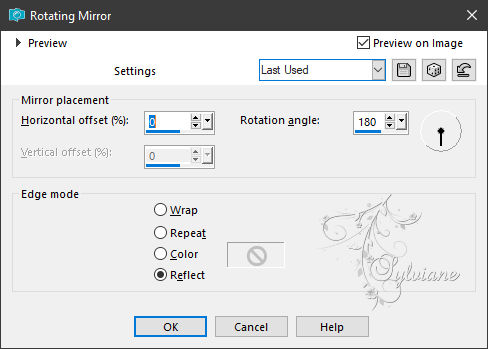
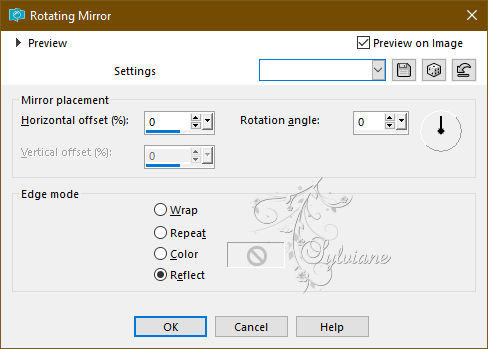
Effects – reflection effects – rotating mirror
Opacity : 40%
=============================================================
8.
On the bottom layer (raster 1)
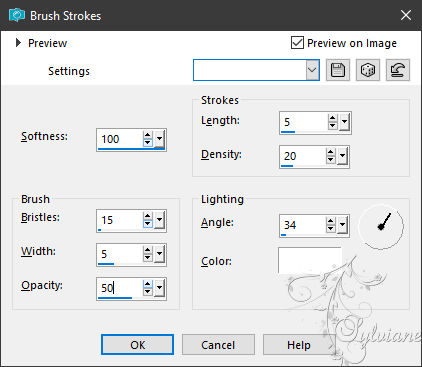
Effects – art media effects – brush strokes
Effects – reflection effects – rotating mirror
=============================================================
9.
Still positioned on the bottom layer (raster 1)
Effects – plugin - Filters Unlimited 2.0 - & <Background Désigner IV > - sf10 Shades Of Shadow :
Open DECO PERSO 2 205 JANVIER 2024 SWEETY.png
Edit – Copy
Edit - Paste as new layer
Set the blendmode of this layer to your liking
For all three of my versions, I set the mode to * Luminance (legacy)*
=============================================================
10.
Before we go any further, let's see where we stand:

Activate Raster 2
Layers - Duplicate
Layers – merge – merge down
Effects - 3 D effects - Drop shadow
0 /0 / 60 /30 - color :#000000
=============================================================
11.
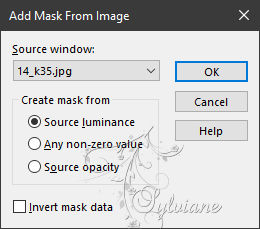
Open 14_k35.jpg
Layers - New Raster Layer
Fill with AVP or ARP color –
Layers - New Mask Layer - From Image - 14_k35.jpg
Layers - Merge - Merge Group
Effects - Edge Effects - Enhance
Layers – arrange – move down (3x)
It must be between the * Raster 4 * and the * Copy of Raster 3 *
opacity to 85%
Image - Add Borders – Symmetric – 2px - colors ARP or AVP OR a 3rd color
=============================================================
12.
Selection - Select All
Image - Add Borders – Symmetric – 20px - color : AVP
Selections – Invert
Effects – plugin - Filters Unlimited 2.0 - & <Background Désigner IV > - sf10 Shades Of Shadow :

Layers - New Raster Layer
Open DECO PERSO 2 205 JANVIER 2024 SWEETY.png
Edit - Copy.
Edit - Paste into selection
The coverage is already at 26.
Fashion this layer to your liking
Layers – merge – merge down
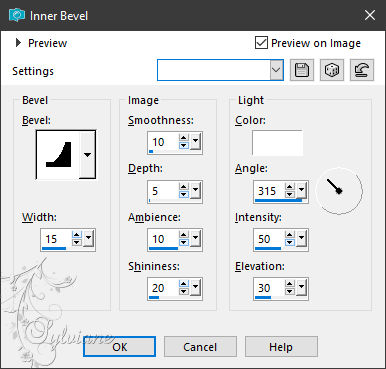
Effects – 3D effects – inner bevel
Selection - Select None
=============================================================
13.
Edit - Copy.
Image - Add Borders – Symmetric -4 - colors ARP or RSP
Selection - Select All
Image - Add Borders – Symmetric -40 px - (regardless of color) -
Selections – Invert
Edit - Paste into selection
Adjust - blur - radial blur
Effects – reflection effects – rotating mirror
Selections – Promote selections to layer
Selection - Select None
=============================================================
14.
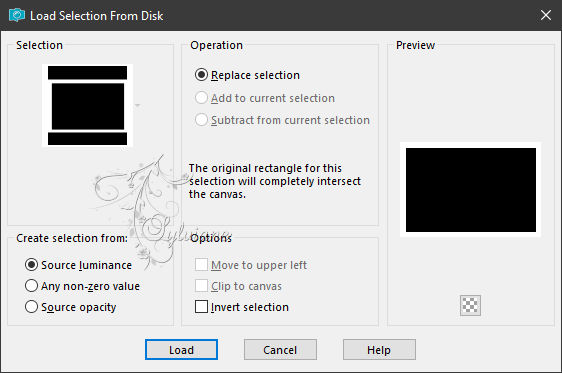
Selections - Load / Save - Load selection from disk - SELECTION 4 205 .PspSelection
Erase OR Delete on keyboard.
Selection - Select None
Layers - Duplicate
Image - Mirror - Vertical Mirror
Layers – merge – merge down (2x)
Selections - Load / Save - Load selection from disk - SELECTION 5 205 .PspSelection
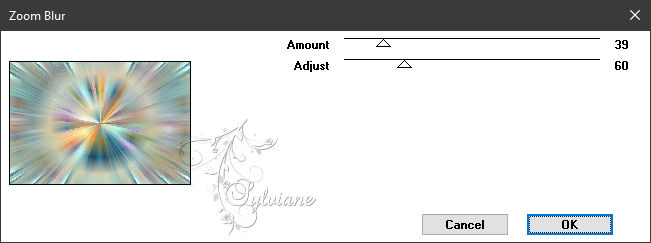
Effects – plugin - VM Toolbox - Zoom Blur
Effects – reflection effects – rotating mirror
Layers - New Raster Layer
Open DECO PERSO 2 205 JANVIER 2024 SWEETY.png
Edit - Copy.
Edit - Paste into selection
Layer opacity at 26. You set the mode of this layer as you like
For my part, I opted for * Luminance (H)*
Layers – merge – merge down
Effects - 3 D effects - Drop shadow
0 / 0 / 60 / 30 Black or any other choice
Selection - Select None
=============================================================
15.
Open DECO PERSO 3 205 JANVIER 2024 SWEETY.png
Edit – Copy
Edit - Paste as new layer
Don't move it, it's in place
Blend Mode: Luminance (legacy)
Open FEVRIER 2024 DEGUISEMENT PASCAL 2 11 02 24 SWEETY.png
Edit – Copy
Edit - Paste as new layer
Image - Mirror – mirror Horizontal
Resize to 75%
No check mark on resize all layers
Open FEVRIER 2024 GNOME EASTER DAY 11 02 24 SWEETY.png
Edit – Copy
Edit - Paste as new layer
Resize to 80%
No check mark on resize all layers
Adjust - sharpness - unsharp mask

Apply a drop shadow of your choice to each element
NOTE: Personally, for my drop shadow, I do this manipulation:
Layer : Duplicate the element to be shaded.
Go to the original below.
Adjust - blur - gaussian blur
Range : 15.
Mode of this layer * Multiply
Opacity up to 60
=============================================================
16.
Image - Add Borders – Symmetric – 2px - colors ARP or AVP OR a 3rd color
Add your signature and mine if you wish
Layer – merge – merge all (flatten)
Resize to 950 pixels
Save your work:
Save as JPEG
Back
Copyright Translation 2024 by SvC-Design
------------------------------------------------------------------------------
Thanks to all who created